PCTeX 6 Tour

|
New --- view PCTeX videos
Welcome to PCTeX 6, the all-in-one typesetting software solution that will enable you to publish your documents, formulas, equations, and thoughts in a professional format and with book-quality detail.
PCTeX is easy to use: you type the source document in the editor, then PCTeX produces the typeset document to view and print. All of the needed functions, the editor, the formatter, and the viewer, are integrated in PCTeX.
The source document is written in a markup language called LaTeX. PCTeX offers some new and intuitive tools that will help you spend less time dealing with LaTeX markup and more time concentrating on your writing. If you are unfamiliar with TeX and LaTeX the Internet offers a wide variety of sources to help you get started. There is a wide variety of books available on the subject as well.
Let's first become familiar with the PCTeX user interface. After a quick overview of PCTeX and its features we will show you how to create your first document.
The Startup Screen
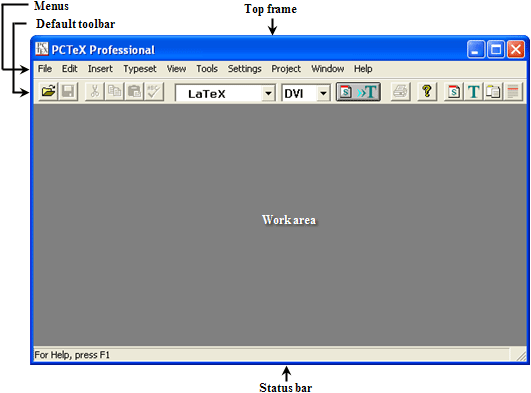
When you first open PCTeX you will see that the startup screen has five parts:
- The top frame title bar - Shows the name of the source or typeset file, whichever is active.
- The menus - Provides all of the functionality of the toolbar, and a lot more.
- The toolbar - There are two: when editing there is the editor toolbar, and when viewing typeset output there is the typeset toolbar.
- The work area - Displays the files that you will be working with (TEX, DVI, LOG, and others).
- The status bar - Displays information about the active file (page number, cursor position, etc.)

The Files of PCTeX
When creating a document in PCTeX, there will be three file types that you will work with.
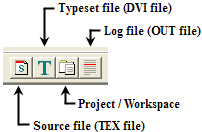
- The source file (also called the TEX file): This is the file you type and edit.
- The typeset file (also called the DVI file): Displays the typeset file (what your document will look like.)
- The log file (also called the OUT file): Provides useful information about the typesetting process.
You can easily switch between the three by selecting their corresponding icons on the toolbar:

The Toolbars
The toolbars contain icons for the most important functions that you will use when creating a document. To start using PCTeX, the toolbar is all you need.
Default toolbar:

When you open PCTeX you will see the default toolbar. The icons that are highlighted in green are mostly used with your source file (TEX file). Use these icons to open, edit, and save your source file.
The icons that are highlighted in yellow are used for typesetting and printing your document. Use these icons to select which format to use when typesetting and the output type (PDF or DVI).
The icons that are highlighted in red will help you navigate between the various files used for your PCTeX document. (see above)
Typeset Toolbar:

If the active file in the workarea is a DVI file, the toolbar changes to the typeset toolbar. Use these icons to zoom, print, and navigate your way through your typeset document.
The icons that are highlighted in green are tools that can be used on your typeset document. Use the select and copy buttons to select and copy sections of your typeset file. Use the magnifier tool to zoom in on small sections of your document. The font info tool shows information about the selected font in the status bar.
The icons that are highlighted in yellow are used to change the view, and navigate throughout the different pages of your document. The PS button changes the view from Post Script to
The icons that are highlighted in blue are used for exporting and printing your document.
The icons that are highlighted in red will help you navigate between the various files used for your PCTeX document. (see above)
